Showing posts with label meal time. Show all posts

Tuesday, August 27, 2013

Quick Dinners

Does it feel like dinner-time feels the squeeze this time of year at your house, too? More extracurricular activities, enforced bedtimes and busy days can lead to the evening panic, but it's not quite time for heavy stews simmering in the slow cooker all day.

Here are some of our favorite quick, late summer dinner recipes.

Smothered Grilled Chicken— When our family makes this, we include zucchini in with the sauteed vegetables. Served with garlic potatoes, it's my husband's favorite dinner. 


Salmon with Spicy Cucumber-Pineapple Relish— I left the spicy jalapenos out of a portion of the relish and my two-year old all but inhaled it. It was great served with a side of rice and sauteed green beans from the garden.


Squash, Mushroom and Black Bean Quesadillas— These are pretty amazing quesadillas.


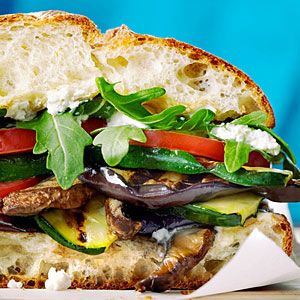
Grilled Mediterranean Vegetable Sandwiches— The lone eggplant in our garden has a meeting with its destiny in this sandwich.


Spaghetti with Cherry Tomatoes— I can't be the only one whose cherry tomatoes are going crazy!

Taco Salad with Pinto Beans and Avocado— Deceptively simple, but so good. A great vegetarian option.

Pork Chops Smothered with Peppers and Onions— I'll admit: I was a bit weary of the fennel seed, but I think it totally makes this dish.

Spinach, Grape and Bacon Salad— Bacon makes main dish salads manly, right?

Grilled Pizza— Topped with little more than cheese, fresh tomatoes and fragrant basil, this is a winner!

Avocado and Turkey Paninis with Ranch Dressing— I really think garden (or farmer's market) fresh tomatoes should get billing in this recipe.

Creamy Chicken and Spinach Pasta— A rotisserie chicken makes this quick and easy.


Chickpea Salad with Lemon, Parmesan and Herbs— Note that you'll want to double this to serve four.

Pasta with Tomato Sauce and Lemony Beans— Sub out the canned diced tomatoes for fresh ones, if you've got them.


Friday, August 23, 2013

Five Friday Finds :: Great Canning Resources

If you would like to start canning, but don't know where to start, here are five excellent places to look for inspiration. Before long, you might be hooked and preserving all the bounty you can get!

  1. A friend who cans. Canners love to share their knowledge, and having someone walk you through your first recipe can bolster your confidence enough to venture out on your own. Ask around and see if you have a friend who would be willing to help you get started or loan you some of their equipment.
  2. Ball Blue Book Guide to Preserving (a great first step) or  Ball Complete Book of Home Preserving (for more info, recipes and methods). After a friend initiated me into the ways of canning on my own, without my mom, this was the next step. These books will show you the ropes, help define different terms—headspace? When to start timing a water bath processing? Fingertip tight? Adjusting for altitude? These books have you covered. And once you have the terminology mastered, canning is just like following any other recipe.
  3. Your local Cooperative Extension office. A fantastic resource for what's going on locally and most offer pressure canner testing, to put your mind at ease before venturing into pressure canning by making sure you're equipment is working well.
  4. Fresh Preserving. Another canning primer, a vast recipe database (searchable by all sort of different factors), troubleshooting, pectin calculator and more. 
  5. Food in Jars. Especially Beginning Water Bath Canning and Canning 101, which has answers to all sorts of questions. Marisa includes lots of new, unique and fresh ideas when it comes to canning recipes and products.

Wednesday, September 14, 2011

Peas + Basil

Hello Nikkala,

I've recently discovered the combo of peas and basil. First I made a sort of pea pesto (peas plus basil, chicken stock and seasonings) tossed on pasta. Now, I've moved on to pea soup.


Being a lover of the color green, this soup was just plain pretty. And the husband, being a lover of crisp bacon thought the soup better for it.

Despite the bacon, a whole bowl full of veggies can't be too unhealthy, right? Bonus that it's super easy and quick to make!


Pea and Basil Soup, with Bacon

Three slices bacon, chopped
One half onion, diced
One clove garlic, minced
One bag frozen peas
Chicken stock
Fresh basil (approx. 4-5 large leaves), roughly chopped
Salt and pepper to taste

Sautee bacon until crisp in the bottom of your pot. Remove once crisp. Sautee onion in some of the reserved bacon grease. Add garlic when onion starts to soften and cook until fragrant. Then add peas and chicken stock. Cook until peas are soft, then add basil and puree. (Don't cook too long, or you'll end up with dull green, icky peas!) Season with salt and pepper, if needed. Garnish with crisp bacon and a basil leaf. Makes about 3 servings.


With a piece of homemade bread, it made a yummy light lunch. Though I have to admit, I think I liked it better not thinned down so much, with pasta and cheese. Though isn't everything made a bit better with carbs and cheese? Then again, it wouldn't have been such a light lunch with those!

Do you think your veggie love boys would go for this?

Bon Appetit!
Deidra

Monday, July 25, 2011

Make Yourself a Dang Quesadilla

Hey Nik,

Have you ever had a really good quesadilla? Like at a restaurant? Now I generally don't go for quesadillas (it's one of the suggestions my husband often makes when I'm out of ideas or didn't meal plan and he almost always gets shot down). But, back when I was interning in DC there was a Tex Mex place, Tortilla Coast, that had a special place in my heart. My roommate and friends frequented it. Tortilla Coast made a dang good spinach and mushroom quesadilla I got hooked on during Lent. One of our friends, an observant Catholic, didn't eat meat during Lent, so he was pretty limited on his selections for those 40 days.

Anyway, all this to say, I've just been converted to the homemade quesadilla. Armed with some knowledge of how to make a good quesadilla, inspired by these zucchini, corn and black bean quesadillas (pinned here) and with a big ol' yellow summer squash in the fridge I made some of the best quesadillas in my life. We fed the missionaries that night, and when 19-21 year old boys start asking about the recipe, you know you have a winner!

Okay, here's how to make a  really good, restaurant quality quesadilla (hint: it's the same way restaurants make everything taste better, more fat and more salt):

 Turn on your pan to medium heat. I usually turn ours to just above medium heat and use a cast iron skillet. You want it warm enough to brown, but not too hot that it burns the tortilla before your cheese melts. And don't get so impatient (ahem, self) that you turn it way up at first because then your skillet will get too hot and you'll end up grateful your husband likes things extra toasty.


Oil your tortilla on one side. I use olive oil.


Spread the oil with a pastry brush. You should have just enough oil to get a fine layer across the whole tortilla.


Sprinkle the oiled tortilla with salt. I use kosher, and probably about 1/8 of a teaspoon, if that.


Put the tortilla, oiled side down, on to the hot skillet.


Oil the top of the tortilla (this was a little too much oil and I ended up rubbing the next tortilla on this to share the heavy-handed dose) and again, sprinkle with salt.


Flip tortilla when it is golden brown on the bottom.


Add fillings on half of tortilla. I prefer to put my cheese on first so it starts melting and then adding my warm filling on top of the cheese.


Fold tortilla in half over filling, browning both sides of the tortilla.


Ooey, gooey cheese and delicious filling


Serve the finished product with a dollop of sour cream and guacamole, if you happen to have it on hand.

As for the filling, here's my squash, mushroom and black bean version:
  • 2 cups diced yellow squash or zucchini
  • 3/4 cup diced sweet onion
  • 4 large white mushrooms, diced
  • 2-3 cloves garlic, minced
  • 1 can black beans, drained and rinsed
  • grated cheese, I used a mix of Colby Jack and pepper jack
  • cumin, coriander, chili powder, cayenne pepper, Sriracha hot sauce, salt and pepper
Saute mushrooms until they have released their liquid. Remove from pan, add a little olive oil and sautee squash and onion. Add garlic in when squash is nearly soft and continue sauteeing. Add in black beans and season with spices and seasonings, to taste (I'm really good at dumping and then realizing: Wow! this is a little hotter than I expected. But good!) And we happened to have a chicken breast in the fridge, so I diced that up and added it too, but it's not needed. Say, if you're observing Lent, or something. :)

Assemble quesadilla as shown above.

Okay, I think I can stop raving about these quesadillas now that I have them written down for posterity.


But seriously, they were so good.

Deid


PS- Did you say "cay-sa-dill-a" in your head every time I wrote quesadilla, or was that just me? Thanks Napoleon Dynomite.

Monday, July 18, 2011

Menu

 Hey Nik,


Not much to say about this week's menu, other than: It's hot here in the mid-west! I'm glad to have the freezer stocked with previously made muffins, waffles and bread. The goal this week is to stay cool and hydrated. Eating might be secondary.

Linked up to Meal Plan Monday.

Enjoy!
Deid

Tuesday, July 12, 2011

Steve-O's Chicken Salad

Hey Nik,

We're having to mix it up with the variety of salads we eat around here. Lucky for me, the husband is a big fan of "girlie salads" (his words, not mine).

We had a Steve-O's chicken salad the other day for dinner. Since we're not close enough to get a fix at the restaurant, we have to improvise and make our own.


A bed of crunchy romaine, topped with grilled chicken, sliced olives, thinly slice red onion, cucumbers, carrots, homemade croutons and our version of their dressing. Since the husband is a tomato-hater, I don't buy tomatoes very often. I'm waiting for the 9 plants outside to start producing ripe ones. Otherwise, there would be tomato, too.

The croutons were just little rounds of multi-grain bread from the grocery (pre-sliced, like for bruschetta). I cut them to bite size, tossed them with olive oil, some Lawry's seasoning salt, fresh ground pepper, some garlic and onion powder and some dried herbs. I broke my summer rule about turning on the oven and baked them at 400° until they were good and crunchy.

The piece de resistance of this salad is the dressing. Store bought ranch gets a healthy dose of red wine vinegar and dried dill. Then be generous with it. I figure that the vinegar thins it out and makes it healthier, so I can use more of it.

With the left-over croutons we've also been able to have chicken Caesar salads/wraps. Mmm. The crouton making was totally worth it. Any one want to contribute more salad ideas? I'm hard up for some! (We had a heat advisory warning yesterday with the heat index somewhere between 105°-110°. Humidity is evil.)

Love, Deid

Tuesday, June 28, 2011

Menu

Hey Nik,

click to enlarge

Thought I'd get this posted today earlier than usual. We've got a busy day ahead of us. We're picking blueberries this morning and then hitting the beach of Lake Michigan this afternoon! Both brand new experiences for me. I have high hopes for both of them.

This week we've got a couple cook outs to attend, so that makes meal planning easier. I just have to come up with a side dish to take to both of them. They will include several of the same people, so I probably should come up with two options. The husband says Okie Caviar is a 4th of July tradition (I had no idea he felt this way!), so that will be our offering at one of the parties. Our recipe varies a little from that one, but you can't go too wrong. Any suggestion for another side?

One of my favorite Fourth of July traditions is a patriotic breakfast. Remember growing up how that was the only day of the year that all six of us would get on bikes and we'd ride to the neighbor's breakfast? I love that memory. We usually host the breakfast now, so no bike riding for us. But it must be eaten al fresco and must contain lots of berries! Speaking of berries, I better go get ready to pick!

Have a great day!
Deid

PS- I like the link up. Again, I'm linking up here.

Tuesday, June 21, 2011

This Week's Menu

Hey Nik,

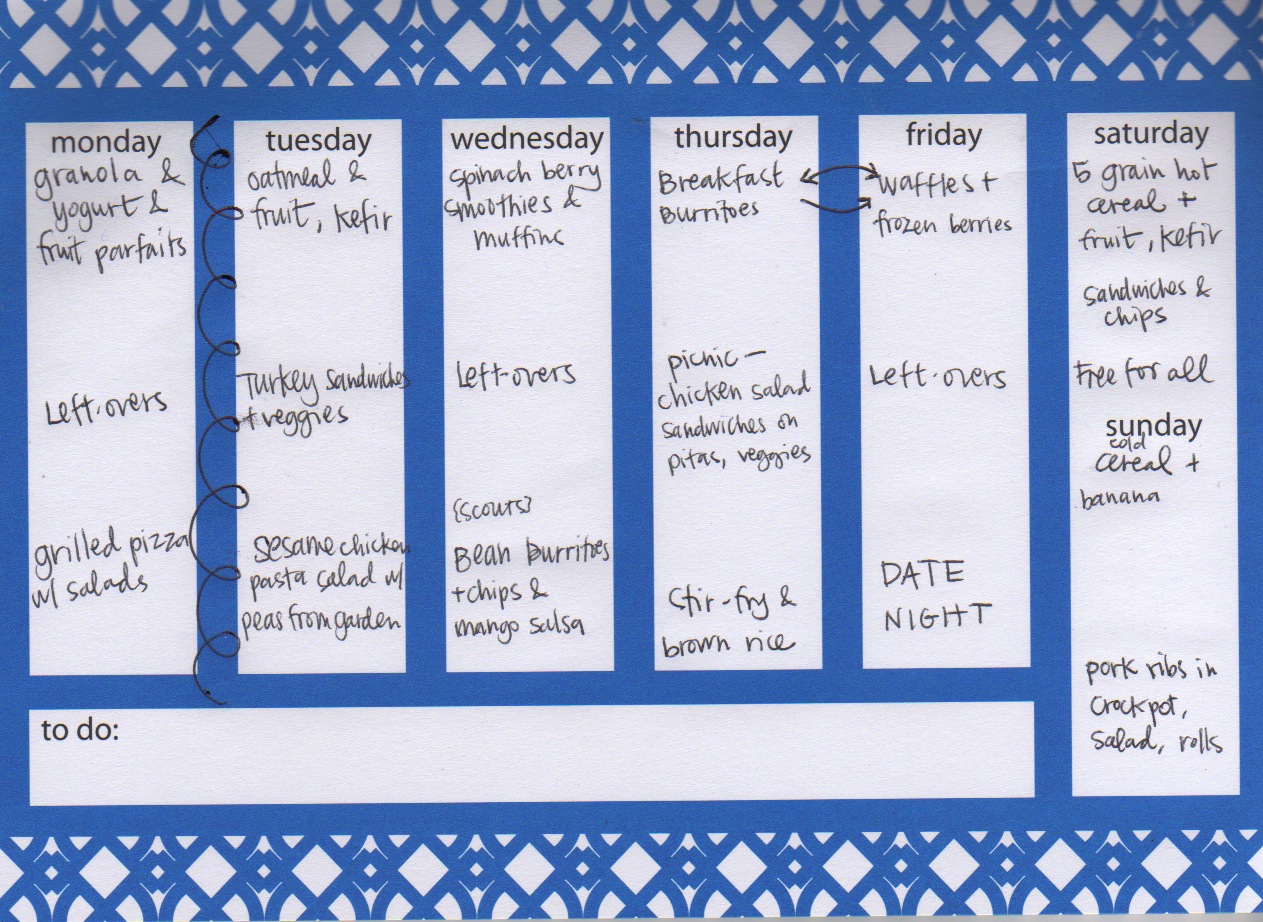
You asked a little while ago about our menu plan. On Monday the husband and I take the time to plan out every meal for the next week, so we plan Tuesday to Monday (that's what the squiggle between Monday and Tuesday represents, below). We make it part of our opening for Family Home Evening, which works well since Baby Girl sleeps right through it, but we'll probably have to adjust that method as time goes on. I make the husband participate because it's so much easier to come up with a variety of ideas with two of us working on it. And we use it as a mini-planning session. (You'll note the husband has scouts on Wednesday, so I marked that down so I'd realize we needed to have something quicker that night.)

click to enlarge

I am such a meal planning convert! We make our plan as realistic as possible. Lunch is usually left-overs or sandwiches. I know there are menus out there that plan just for dinner or they plan something different for each meal. Those don't work in real life! It would work if we only ate one meal a day, but we prefer three around these parts.This meal plan is as real as it gets, even where I decided we couldn't have burritos for dinner and breakfast burritos the next morning, so I swapped things.

People love menus because it helps them save money and use what they have, but I plan out our week because it helps the husband know what to expect. That way, if I'm busy doing something else, he can look at the menu and get a meal started. Before he would be paralyzed wondering something like, "Is she saving this green pepper for something else, or can I make fajitas?" Not that I ever got frustrated with my planned, but not articulated, ideas for food for the next few days.... It also helps us in the other ways, too. About a month ago I was wondering why we were eating out so often. Well, duh! We hadn't planned out that week and when dinner time rolled around, I was lost.

Would you want to have our menu each week? We plan it anyway, so if you'd like to see it, let me know!

Yours in eating,
Deid

PS- I'm linking it up here on Menu Plan Monday.

Wednesday, May 4, 2011

Meatball Subs

Several months ago I spotted "Meatball Subs" on a friends menu plan. The thought has stuck with me through the months and I finally got around to making them last week. And we're having them again this week. They were that big of a hit and that easy to put together! (Funny little aside: I told the friend that I had been inspired by her menu plan and had been thinking of meatball subs ever since. She told me they'd never had meatball subs! I am convinced I saw it written up on her whiteboard, but either way, I found a winner!)

You will need meatballs and spaghetti sauce. You can use homemade meatballs and sauce or go the easy route and use pre-packaged of both. I just had a baby, so I chose pre-packaged... Okay, so I'd probably choose pre-packaged even if I hadn't just had a baby!
The first time I made these we simmered the meatballs in the sauce in a pan on the stove. This time I opted for the slow cooker. Either way works. Follow the directions on your meatball package for cooking them.

After your meatballs are cooked through preheat your broiler. Spoon the saucy meatballs onto hoagie buns, sprinkle with shredded mozzarella cheese and broil. I added on sauteed mushrooms and caramelized onions, not because they are necessary, but because I had them in the fridge. If I wasn't saving the bell pepper in the fridge for Cinco de Mayo, I'd probably have sauteed it and used it, too. The first time we made these it was strictly meatballs, sauce and cheese and they were good enough to make again!
Pop the open-faced subs under the broiler until the cheese is melted and bubbly and the bread is a bit toasty.
A hearty, easy meal that comes together pretty quickly. We served ours with corn on the cob and sweet potato fries. Yum!

Wednesday, March 30, 2011

Dressed Up Brownies

When we were dating and first married, I used to bake and cook real food. Food that required intense recipes and skill and could almost eek its way into the gourmet category. Deidra and I use to take cooking classes taught by real chefs. Man, my husband misses those days! Now it seems that there is less time (even though I worked full time back then) to spend in the kitchen. Or maybe it is the extra "help" I have in the kitchen with me now. But sometimes pulling items from the pantry is as good as it gets around here. Perhaps its a pride thing, but I can't let myself be someone who shows up with a normal offering to a potluck dinner. I like my food to be oohed and awed over as much as I like blog comments. Come on, admit it, you do too.

Enter a brownie mix and creamy peanut butter. This is so simple you aren't going to believe how good it is. Prepare the brownie mix according to the box and pour into the suggested pan size.

Then take some of that creamy peanut butter, a good sized scoop--oh about a 1/3 cup I'd say. And put it in the microwave for 20 seconds, stir, and microwave again if it isn't melted enough to drizzle. Then drizzle or drop the peanut butter on top of the brownie mix. Bake according to the directions on the box. Yum peanut butter + chocolate. They make the perfect couple.


Far from gourmet, but I'd be lying if I said it hadn't been oohed over a time or two!

This is a post in the series, Fixing Up Dinner, dedicated to taking boring convenience foods and turning them into a tempting restaurant menu item.

Wednesday, March 2, 2011

Fixing Up Dinner:: Fish Tacos

Let's face it, eating out costs money. And since we rarely get out without the kids, it really isn't that much fun either. Unless you think repeatedly pulling a two year old off the table is fun. I don't. So eating out costs money and it isn't usually fun with a couple of pre-schoolers in tow. But when Friday night rolls around I don't want to cook. For some reason in my little head I'm still associating Friday night to date night (sometimes it still is!), and I'm not ready to give in to it being like every other night.

So when take-out isn't happening, I've come up with a list of our favorite restaurant items made with ingredients from the freezer. Here's one of our go-to Friday night-almost at a restaurant-options.


First, cook up some fish sticks. Yep, Van de Kamps on a Friday night. I still associate fish sticks with my Friday night babysitting gig in 1993. Fish sticks and tater tots. Don't worry, this is so much classier!
Now place a few fish sticks on a warm tortilla. Have you ever ordered fish tacos? Most of the time the fish is breaded cod. Um, that's what fish sticks are. We've used left over salmon, too, and it is delicious as well. We just don't have left over salmon hanging around very often.

Top with some chopped cabbage.

And finish it off with mango salsa! If you don't have mangoes on had you can top with lemon juice, or go for the tartar sauce like my husband.

It really couldn't be easier! While my husband and I are dining on fish tacos and mango salsa the boys are in heaven eating their fish sticks. Its a win-win dinner!

Fish Tacos
fish sticks, cooked according to package
tortillas
chopped cabbage
mango salsa


Mango Salsa
chopped mango
chopped tomato
chopped cilantro
juice from either a lime or a lemon

This is the first post in the series, Fixing Up Dinner, dedicated to taking boring convenience foods and turning them into a tempting restaurant menu item.

Thursday, February 17, 2011

Results of Our Valentine Manners

Did you play along for the 5 weeks of Valentine manners and etiquette dinner?

Our boys did pretty well over the course of the 5 mini-lessons, but when faced with the final tests we experienced a few snags.

Saturday, we took them to a nice sit down restaurant. It wasn't anything fancy, but definitely a different atmosphere than home. After some consulting with Dad, our 5 year old gave his order to the server. Manners were being used and we had a nice conversation waiting for our meal. And we waited and waited and waited. Our server apologized for the delay several times. During the wait our 2 year old turned into a total monkey and was climbing under the table, laying on the floor. Basically he was behaving like a hungry two year old. The long wait was not an ideal situation for well behaved kids, but they did an okay job considering.

On Valentine's Day the boys and Dad fixed dinner and we sat down to a candlelit dinner. Which quickly turned into a spooky ghost story telling dinner. Not what I had in mind when I lit the candles, perhaps, but a fun time no less!

Where there ghost stories at your Valentine dinner?

Tuesday, February 15, 2011

Mom's French Bread

Living far away from family, sometimes I have to create a little bit of "home" here. Growing up my go-to meal request was homemade lasagna and this French bread. Nearly every birthday I can recall featured this as my birthday dinner. It was just the thing last week on the tail end of a blizzard and sub-zero temperatures. Somehow, all felt a little bit better in the world with my favorite meal on the table.

This isn't your crusty French bread loaf. It's soft, with a tiny crumb, perfect for mopping up lasagna. I love the shiny crust and the sesame seeds. Though I enjoy loaves of rustic, crisp-crusted bread, this is my all time favorite.

Mom's French Bread
Originally from a 70s era church cookbook. Lucky for our community, Mom submitted it to a more recent church cookbook. And lucky for me that she did, because most of her recipes are just a list of ingredients and a time and temperature. This one is a little more involved than that!

2 packages (4 1/2 tsp.) dry yeast
1/2 c. warm water
2 c. hot water
3 TB. sugar
1 TB. salt
1/3 c. oil
6 c. flour

To top:
1 beaten egg
Sesame seeds

Dissolve yeast in warm water. In a large bowl combine sugar, salt, oil, hot water and 1/2 the flour. Stir in dissolved yeast mixture and remaining flour.
Turn out on floured surface (or leave in bowl of stand mixer) and knead 5 to 8 minutes. Cover and let rest 10 minutes, then knead about 100 strokes (I knead for 1 minute in my mixer). Allow to rest 10 minutes. Repeat until dough has been kneaded 5 times.
Divide the dough in half and roll each half into a rectangle, 9 x 12 inches. Roll loosely, as for a jelly roll, starting from the long end and sealing ends. Place seam side down on a greased (or parchment lined) cookie sheet (half sheet pan). Arrange so both loaves fit on one sheet. (Or just make shaggy loaves without the rolling. It will all even out in the rising.)
Brush with beaten egg and sprinkle with sesame seeds. Gash top of loaf with a sharp knife.
Allow to rise 30 minutes, then bake for 30-35 minutes at 400° until golden brown. Let cool before slicing.


{Since there are only two in our household, I chose to make four loaves, half the size (and used a quarter-sheet pan), and baked for a little bit less time. One loaf was devoured at dinner, one was saved for the next day, one went into the freezer and one was given to a single classmate of my husband's. The guy thought he'd hit the jackpot!}

Monday, January 10, 2011

5 Weeks of Manners and Valentines Dinner

Valentines Day is in 5 weeks and if your kids are like ours, there's much room for improvement at the dinner table! One of our sisters mentioned she was doing this in their home and we thought it was a great idea. For the next 5 weeks (now until Valentine's) we'll work on our table manners (1 manner per week) and then on Valentine's Day we'll have a fancy dinner where all manners will be used.

If you have older kids then your manners will hopefully be more advanced than ours (I'm really hoping we grow out of "don't put your hand/food in your drink!" at some point).

This cute place setting is from Martha Stewart. Print on cardstock and cut out to help the kids learn how to set the table. Maybe once they know where each utensil goes and what they are for they'll start using them!

Some ideas for the weekly etiquette practice:
  • Chew with your mouth closed.
  • Don't talk with food in your mouth. Chew, swallow, then talk.
  • Use please and thank you. "Please, pass the...." and "No, thank you."
  • Use your napkin and utensils and leave unwanted food on your plate-not on the table or the floor.
  • How to set the table.
  • Eat slowly
  • Don't make rude comments about the food being served.
  • Ask to be excused from the table when finished.
  • Thank the cook
Are there other basic manners I am overlooking?

When I suggested 5 weeks of manners and a fancy Valentine's dinner to my 5 year old he responded, "Okay, but me and Dad get to make the dinner!"

Wednesday, January 5, 2011

Week at a Glance

One of my New Year's resolution is to plan better. To take control. To be proactive and not reactive.

In order to be proactive at home I know that I'll need to have a plan. I usually do pretty well at flying by the seat of my pants, but have recently realized that there might be a better way for me. So I'm going to give planning a chance. I made up this simple chart to help me. There is so much packed into this bad boy that I'm actually giddy over it! I've taken some ideas I know will work and some I think may work for me and combined them on one sheet of paper to hang on my fridge. The idea is that Sunday mornings I'll print a new one and start plotting out my week.

Week at a Glance

There's a box for every day of the week, duh. And a box for notes. Right now it is being used as my shopping list. Then there's a spot for me to plan a menu in advance. I've never been a meal planner and I know even trying to plan a week at a time is setting myself up for failure, so as long as I have the next day filled out before I go to bed it will be doing its job. By having a dinner plan before 3 pm will put me in control of that situation.

The next line is for housework. This is my take on the FlyLady system. Everyday I'll pick an area to spend 10 minutes working on and eventually my house will be immaculate (ha!). Even if it isn't immaculate it will be better than it was before. Its all about the baby steps!

The dots at the bottom are to keep me accountable to myself. The top 2 are for exercise. Each dot represents a half hour, The next line of 5 is for my servings of fruits and vegetables and the bottom 8 are for glasses of water. I'll put a check mark in the bubble to keep track. Hopefully there are no empty bubbles at the end of the day.

So there it is, my effort to plan ahead while still allowing the flexibility I know I need. Feel free to download your own weekly planner and join me in being proactive in 2011!