This summer I was invited to a "Favorite Things" party. I wasn't lucky enough to come home with a snappy bag, but the seed was planted and they have become my go-to sewing project ever since.
I love that they're quick, useful and I can use up some scraps to make them. The tape measure inside snaps itself straight, making for a self-closing bag. No more loose change, toys or chapstick floating around your purse!
Let's get started:
Cut two pieces of fabric, identical sizes. A good starting point is 7" x 14". I've done bigger and smaller, too.
Stack them, right sides together.
Stitch around the outside edge, leaving an unsewn opening, about 1.5". Before turning the bag right-side out, clip those corners to help those corners turn to a nice point.
Turn the bag right-side out through the opening. Then push the corners out (I use my bone folder) to get sharp corners.
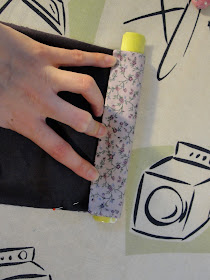
Fold inside edge (of short end) over tape measure to measure width.
My tape measure was 1.5". Pin edge down, and mark opposite edge the same.
Sew both edges to create a channel for tape measure.
Fold bag in half, wrong sides together. Stitch just ONE length of bag closed. (I chose to stitch the side with my turning opening first, to make sure I caught that.)
After sewing the first side, measure the length of tape measure needed, accounting for seam allowance. Bend tape to length and crease. The easiest way to cut to length is to snap the tape in half with a pair of pliers (second time raiding the tool box for this project!).
Cut two lengths.
Round off the edges of the tape measure (with a pair of BAD scissors, not your sewing scissors!!) and cover the sharp edges with tape. Electrical tape works really well, but I'd raided the tool box too many times and we were out. Packing tape works well, too. You just want to cover those edges so they don't cut through your fabric. Trim off your extra tape to keep bulk down.
Slide tape measure into channels, making sure the concave side (the one with the numbers) is facing the lining, or inside, of your bag.
Push the tape as far away from opening, pin and sew closed.
Almost done!
Pinch off bottom corners to square them off, making the bottom of the bag boxy. You will have a pointy triangle. Mark both corners and sew across.
After sewing both corners, clip the excess fabric.
You can zig-zag stitch that raw edge, but I've never had a problem leaving it as is.
Turn the bag right-side out (working the tape measure can be a little tricky, but just make it bend for you as you flip it out), push out corners and enjoy!


Thank you. Your explanation is very detailed.
ReplyDeleteThanks
Now that is what I call a top notch tutorial. Photographs were clear, close up and plentiful. Explanations were clear with sufficient information and consistent with the photographs. Thank you so very much. My 90 year old friend has a birthday next week and this will be the perfect gift.
ReplyDeleteI commented in the past but it obviously didn't get published.
ReplyDeleteWhat I said was that this is one of the best tutorials I have come across.
Now I have made several attempts to make one and I find that the thickness
at the top side edges where the tape goes through prevent a really good tight
closure.
This is one of the best tutorial I have come across.
ReplyDeleteThank you for the detailed step by step procedure.
I have tried 3 so far and am sure it will improve.
However I find that the closure is not snug due to the thickness
of the top sides. Mine looks like yours so I am wondering if
I just need to use a heavier duty tape. I will try doubling it next time.
Thank you so much.
I too have had the same issue....not quite sure the problem? Any suggestions?
DeleteI've never had the problem that is noticeable on the fabric bulking up, even using a microfiber. I make sure those seams are REALLY small, no quarter-inch seams there. As narrow as I can make it helps.
DeleteI use tape from a Stanley brand tape and they're some of the most heavy-duty around. (Glad my dad had one that got dropped and broken, because I don't know if I'd want to buy that nice of a tape to chop up.) Good luck!
the tabs to pull it open are nice to add...which side is concave? the one with the numbers?
ReplyDeleteThis LOOKS like a good tutorial, but actually doesn't turn out well. The sizes given are much too small - if made with 7"x9" fabric, the bag will end up about 6"x 3.5". (a comb case?) Looking at her pieces on the cutting board, she used 7x14??? Then, as another comment indicates, the bag seams are so thick that the bag doesn't snap completely closed once it is turned right side out (works great with the seams outside). Try another website for a better pattern.
ReplyDeleteYou're right that I had the wrong dimensions. I've edited the post to show that. Though I do like smaller bags, too for entertaining little ones with all sorts of random things inside.
DeleteI've read about 5 ways to make these bags. I like your way the best. Most of mine have 6-7 inch tape in them but I tried to make a small coin purse one last night with 3.5" of tape and it's not snapping. Any ideas why that would be? Just too small? Thanks for the tutorial. You're good at it.
ReplyDelete