I'm obsessed with all things baby lately. Blame in on the pending due date--less than a month!-- coupled with my previous ambivalence about it--we'll get ready for baby one day. Well, one day is now. Because this baby could show herself any day. (Cue freaking out!)
We finally got the crib out of the box and put together, and bought a crib mattress. Slapped down the mattress pad I scored on a clearance a while ago and started the hunt for crib sheets. From everything I've read, I'll need, or want, 3-4 of these. Everything I could find was either cheesy nursery print, boring, ugly and/or expensive. (Expensive being defined as something I considered too high priced for a few yards of fabric. Especially when multiplied by 3 or 4.)
So I decided I could make some. While making the bed a while ago I analyzed how a sheet was made and figured I could do it. I had roughly mapped out the concept in my head, measured the mattress, and then wisely decided to google for more information.
Here's the quick run-down: 2 yards woven cotton, pre-washed (I can't recommend this for jersey knit, due to the stretching). 48" elastic (3/8" or 1/4" wide). Thread, sewing machine, scissors and ruler or tape measure.
I first ripped my short ends to make sure things were squared up. Nothing bothers me like the wonky cutting you get from stores. Except maybe stray threads.
Then I trimmed them up with a ruler and rotary cutter to get rid of those frayed edges and stray threads.
Hem unfinished edges. I left my selvage edges alone, because I don't care for hemming. And I might be lazy. This worked out fine, even with the printed edge, because it's tucked so far under the mattress you never see it once it's done.
Then notch each corner 8". (I saw recommendations for anywhere from 8"-9", but with my 6" high mattress, 8" was plenty.) I used my rotary cutter and ruler, but you could make a template out of paper and use that if you don't have a rotary cutter, mat and ruler.
Bring the unfinished edges together, right sides together. Sew seam to form pocket.
I ran two seams here, since this will be getting the brunt of the wear and tear. Then I finished off the seam with a zig-zag stitch.
Repeat for all four corners. (I stopped after doing one side and made sure that everything would fit on my mattress. It did. You might want to check, just to make sure.) It should look like a sheet, minus the fitted-stretchy part by now. Exciting!
Cut your elastic into four 12" in pieces. Fold in half to find the center.
Then pin center to the corner seam.
From center seam, measure out 12", and pin the elastic here. (You'll be stretching the elastic 2x its length so it will gather up. I have some remnant elastic that won't quite be 12", but knowing to stretch it twice its length will work great for the next sheet.)
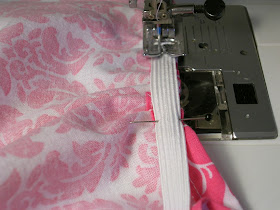
Stretch out your elastic, pin in the center (6") and then half-way between center and the two other pins. Repeat on the other side of the sheet seam.
Set your machine to a zig-zag stitch. Tack down the edge of the elastic, then stretching from the front and the back (once you start going), sew the elastic right along the edge of your sheet. I find it easiest to not necessarily work from pin to pin, but stretching a manageable length as I go along (which is usually longer than the 3" between pins).
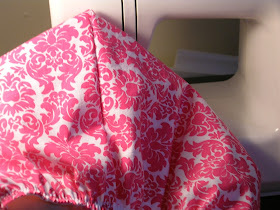
It will form a fitted sheet corner.
Repeat for all four corners, then put on crib mattress. And pat yourself on the back, being thrilled with what you accomplished.
Crack the door every time you walk past the baby's room to smile at the fact she has bed to sleep on-- with a sheet! That you made! And realize that the hinges on that door are the squeakiest things ever. Insist your husband gets the WD-40 and oils the hinges, so you have a fighting chance of one day peeking in on a sleeping baby. Then proceed to tell your husband [all night long] how awesome you are for making a sheet that fits really well, isn't ugly and was pretty inexpensive. Success! (And yes, I realize you could probably find less expensive crib sheets out there. But for a crib sheet I really liked and doesn't bug me, a few dollars more, plus my time, was worth it to me.)
Here's a shot of the first sheet I made, but didn't photograph the process because I didn't know how well it was going to turn out. I think I like this fabric better than round two, but I like both of them way more than any pastel ones! (The lines are bumps from the mattress pad beneath it.) The tutu-ed bird is a gift from a friend. Her young son picked it out and named it "Beauty." We love it!
I feel like I need a disclaimer here, so here it goes: Please use common sense when making things for your baby to sleep on. Make sure it fits securely and snug on your mattress. Follow recommendations for safe sleeping.
I gleaned some information from this tutorial and these quick instructions.


Deidra, I also wash mine a couple times so they are not so stiff. And use the same process with approx 4" corners for a pack n play mattress.
ReplyDeleteI made crib sheets for my granddaughter, using the same methods and they were lively... much nicer than the items in the stores... and they matched the quilt I made for her.
ReplyDeleteI also made crib sheets for my granddaughter using the same method as you. They were so much nicer than store-bought and matched her decor and the quilt I made her.
ReplyDeleteI made crib sheets for my granddaughter, using the same methods and they were lively... much nicer than the items in the stores... and they matched the quilt I made for her.
ReplyDeleteCan you use the same method to make a queen (or any size) fitted sheet?
ReplyDelete